Tuesday, November 22, 2011

Kid's Thanksgiving Stuffing

I saw this pattern for Kid's Thanksgiving stuffing last year in  Family Fun Magazine. I finished most of it a few weeks ago but haven't posted it yet because I had not yet sewn the cornucopia. It would have been nice if it would have been posted early enough for those of you who would like to have time before Thanksgiving but you can hold on to it for next year like I did!


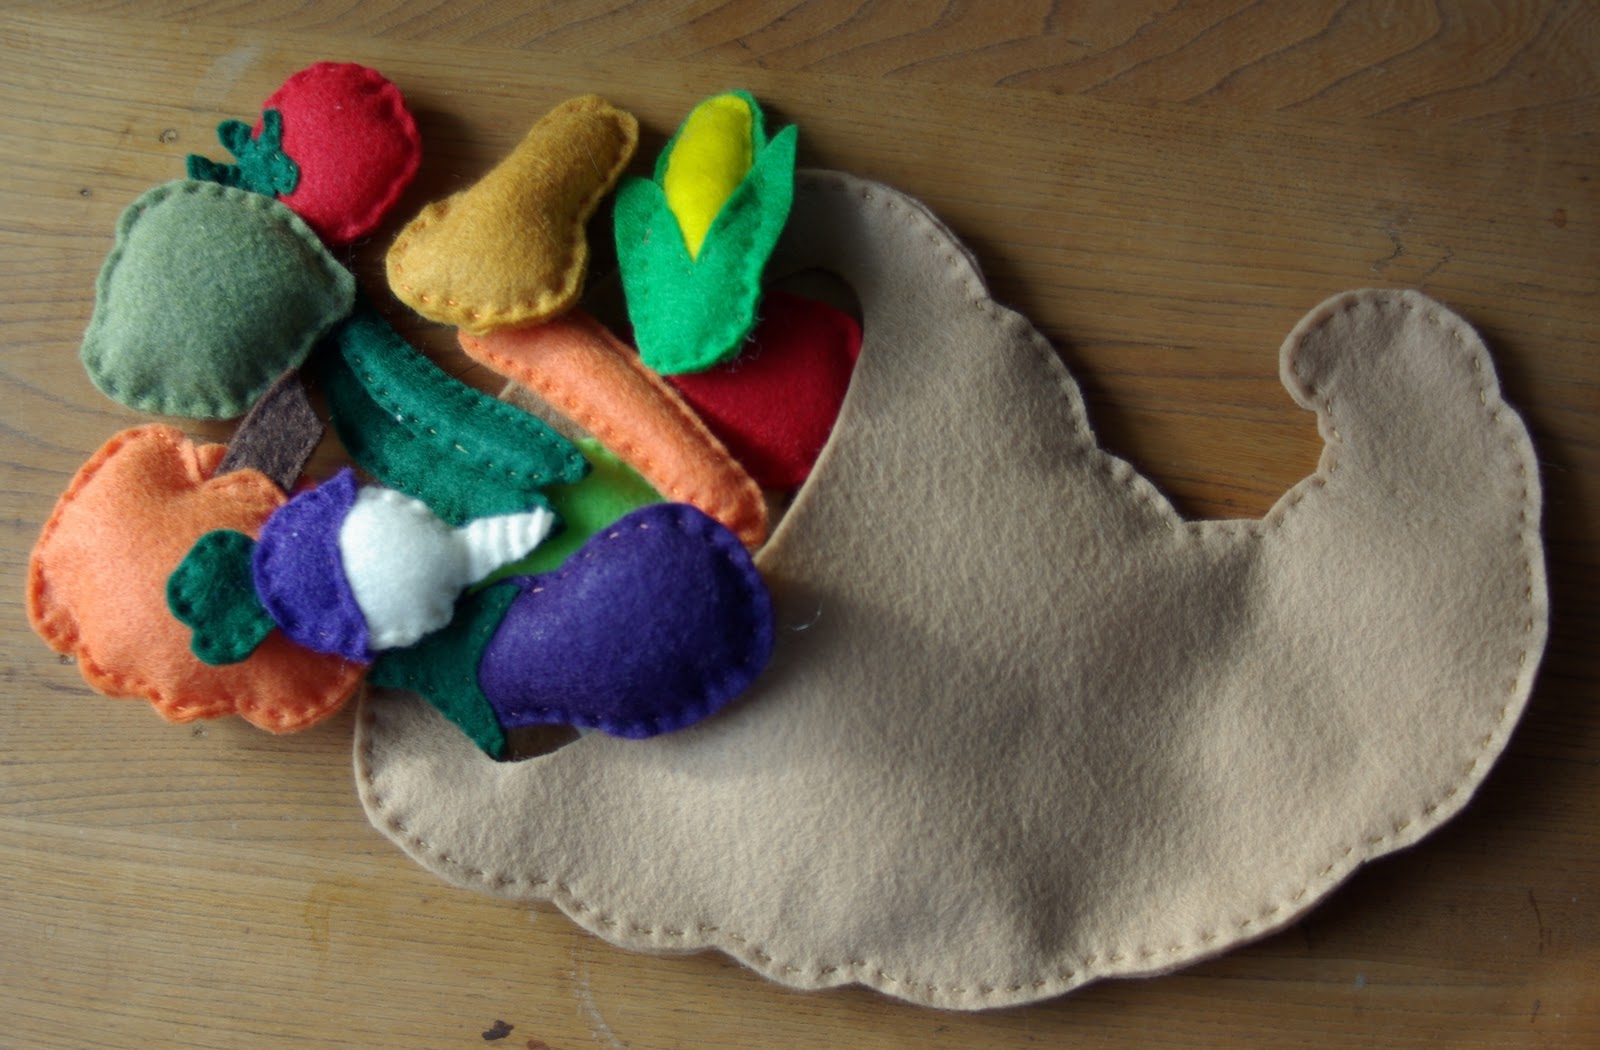
Pattern includes: cornicopia, pumpkin, apple, eggplant, butternut squash, turnip, apple, onion, garlic, corn, carrot, green beans, acorn squash, tomato, potato and pear.


The only thing that I really did different from the pattern is that since I was taking so much time already, I cut two pieces for all the stems and sewed them together also to make them more sturdy to last through toddler play.


Click HERE for the template for the Thanksgiving stuffing. They claim that this project will take 1-2 hours but I warn you that they LIE! Between cutting the template, cutting the felt and hand sewing 16 pieces total, I'm guessing it was closer to 5-6 hours. Maybe it took their entire staff 1-2 hours as they worked on it together, who knows!

 Making stew with the vegetables!

 Taste test to make sure that it's just right!

 No sense crying over spilt...stew!


I hope you enjoyed and have fun making your own! I am hooked on the felt food and might venture onto some fried eggs, bacon and toast that I saw on another blog!

Amy


Monday, November 21, 2011

The BEST Apple Pie Ever!

I know that apple pie recipes come a dime a dozen but that doesn't make them all equal! I am claiming this as my own recipe because I have looked at and made MANY apple pies and in the end, this is the combination that I love. I do have some proof behind my claim of this being an awesome recipe because I sell these at my parents' over opening hunting weekend and have gotten great compliments on them (this year I sold about 30 apple pies!)


Apple Pie

Filling:
7-9 apples
1/2 cup sugar
1/4 cup flour
1 teaspoon cinnamon
1 teaspoon nutmeg

Topping:
1/2 cup sugar
1/2 cup flour
1/2 cup (1 stick) butter- butter must be cold!

Preheat oven to 425°. Peel, core and slice apples. Combine sugar, flour, cinnamon and nutmeg, then add to apples in a large bowl and stir well. Unroll, (yes, I use Pillsbury crust!) pie crust and line pie tin, fluting the edges. Fill crust with apple mixture. Combine ingredients for the topping in a food processor and process until there are only small pieces of butter. If you don't have a food processor you can do this step by hand with a pastry cutter. Sprinkle topping over apples. Place pie in preheated oven and loosely cover with foil. Bake for 25 minutes, then remove the foil and bake another 20 minutes. So, a total of 45 minutes. If you don't have time to worry about taking the foil off half way, you can put it in the oven for the entire 45 minutes without foil but I find that the crust and top get a wee bit too brown. Let cool and hide until you plan to serve or you might risk the pie disappearing unexpectedly:)

***Here's the key to great apple pie: use more than one apple variety! I heard one woman at an orchard where we were picking apples once say to go picking apples, not being particular to the variety but grabbing many different types. If you are purchasing them at the store, buy at least two varieties. If you can, try to get one hard apple and one soft apple and/or one sweet and one tart. This year I have been mixing Cortlands (hard) and different gold varieties or Macintosh (soft.) The point of all this is that when you bake the pie, some apples will become very soft and some will remain a little more firm which gives a great texture and taste combination!

"Let Me Do My Best Today"

I have been a little lazy these past two weeks with my Monday Inspirations. I have been SWAMPED lately (as many moms are) mostly due to my own goals and projects. Most of them will be posted here soon. I have been at my parents' for just shy of a week and have looked repeatedly at this plaque that my mom has displayed since I was young. I'm guessing that I have read it somewhere between a hundred and a thousand times. I thought that this would be a good saying to share today.

"Let Me Do My Best Today"

LET ME DO MY BEST TODAY,
NOT FOR WHAT MY FRIENDS MAY SAY,
NOT FOR GLORY, NOT FOR FAME,
NOT FOR ALL TO KNOW MY NAME,
NOT FOR SHOW AND NOT FOR THANKS,
NOT TO RISE ABOVE THE RANKS,
NOT TO HEAR THE CROWDS APPLAUD,
JUST LET ME DO MY BEST... FOR GOD.

                                                  -Author Unknown

Like I said before, I have read this many times as I was growing up in my parents' home. When I read this now, I realize how much more true it is for parents. Let me do my best today, I can be guaranteed that I will not gain any glory, fame, any sort of acknowledgement and definately not any thanks. What I do today matters though, alot, because what I do today will affect my children, myself and my entire family as a whole. So, let me do my best today!

Have a great week!

Amy

Wednesday, November 9, 2011

Yam Casserole

With Thanksgiving closely approaching, I just have to share this Yam Casserole. My mother found this recipe around 15 years ago and it quickly settled into part of our family's Thanksgiving tradition. In fact, the first time that I brought this to my husband's Thanksgiving we were still dating and my now father-in-law declared that I was officially invited to every Thanksgiving from then on. When my husband joked about what would happen then if we broke up, my father-in-law replied "then I guess it might be a little awkward for you!"


Yam Casserole

4 pounds yams- cooked & mashed (stab yams & bake on cookie sheet for one hour at 350°)
1 cup milk
1 cup sugar
2/3 cup butter, melted
4 eggs, beaten
2 teaspoon vanilla

Combine ingredients and fill dish. Personally, we put it in a round or square deep casserole dish but it could go in a 9x13.

2/3 cup packed brown sugar
1/3 cup flour
2 tablespoons cold butter

Combine the ingredients, cut the butter in with a pastry cutter or in a food processor.
Then add:

2/3 cup pecans
2/3 cup flaked coconut

Sprinkle topping over yams. Bake uncovered for 30 minutes at 350°.

Enjoy!

Amy

Monday, November 7, 2011

"A Few Words to the Public"

At my MOPS (Mothers of Preschoolers) meetings, they always start the day with a devotion. Last year the leader mostly used two books, both of which I really liked and asked for the titles to purchase for myself. "Hold You, Mommy" is my personal favorite and that is where this post comes from. I'm not going to post the entire devotion but simply the "guts" of it. It speaks to the power of words that are spoken to our children (although, really for anyone in our lives) in public.


"A Few Words to the Public"

    I sat waiting as my tires were being rotated, when a grandfather walked in with his adorable little grandson who looked to be about four years old. With his buzz haircut and big eyes, the little boy looked practically irresistible. The owner of the tire shop noticed the little guy too and said, "That's a good-looking boy you've got there." I listened for the grandpa's response. My wide-eyed smile fell when he sarcastically commented, "Oh, he's trouble!"
    How do you respond to that? The owner ran his hand over the little fella's stubby hair in comfort. My heart hurt for the boy. I thought about the great opportunity that this grandfather had been given to publicly build this little boy up, and he missed it.
   Have you done that? I have. It's easy to do. Sometimes we're so frustrated with our kids that when someone says they are well behaved, we want them to know the truth: "You should see them at home!" Or if someone says, "They look like so much fun," it's tempting to reply, "You wanna take 'em home with you?"
   A mom shared with us that when answering the phone, her husband always greets the caller with, "Trevor and Parker's proud father." Isn't that great? That dad is taking every opportunity to build his little guys up "in public" where his kids can hear. I'm sure they'll always remember that! Fred Hartley, Jr., author of "parenting at it's best", said, "The only thing better than personally receiving a sincere compliment is publicly  receiving a sincere compliment."
   One grandma told us, "What you say about your child in front of someone else is what they'll remember." Laurie and I, along with our brother, know that she's right. We remember our dad introducing each of us to strangers as his "right'-hand man."
   We didn't mind him calling us that. I was so excited that he was glad to be with me that I cherished the title of "right-hand man." After his words of public praise, I wholeheartedly helped him in any way I could.
   God modeled this public approval for His son as well. After Jesus was baptized, "A voice from heaven said, 'This is my Son, whom I love; with him I am well pleased' " (Matthew 3:17). Jesus had the blessing of His father, complete with a public declaration of approval.
   Our kids need that approval from us too. The next time you have the chance to publicly compliment your kids, don't miss it! What you say about your kids in front of someone is what they'll remember.

  
"Hold You, Mommy" by Laurie Lovejoy Hilliard &Sharon Lovejoy Autry


   After reading this devotion I realized that I am too honest about my family. It is an easy trap to fall into because when children are born they have no idea for quite some time what you are saying. When one of my babies would be a month old and people ask how things are going, I can picture that I would admit "good but exhausting." This can continue on until they are four and one day I realize that I just admitted to someone that they are a handful right in front of them.

   My son is and always has been an awesome sharer. I have really noticed lately that when I tell this to someone in front of him he has the biggest smile on his face. He then proceeds to go above and beyond and start offering his treats and toys with others just to show how well he really does share. At the same time, if I tell someone that he can be a challenge, why would I expect him to not proceed to prove me right. This reminds me of something I read many years ago. A woman was saying how much her husband always spoke highly of her when talking to others, she went on to list the qualities that he would praise and she thought to herself "I had better figure out how to become all those things before he realized that they were not all true!" It made me think of how much better our relationships would be if we would choose (yes, it has to be a conscious choice) to look for the good in each other instead of focusing on the negatives. I know that I'm not perfect (no laughing) and I don't want my husband to dwell on that so why would I do it to him.

This takes me back to one of my previous posts. The words to "Encouragement" by Don Wharton are very fitting with the rest of this post. Just imagine what we can accomplish with a little encouragement. Even more, imagine the possibilities of what our children can accomplish in their lives if given ample encouragement. Pretty powerful!

Have a great week!

Amy

Thursday, November 3, 2011

Apple Stamping Tutorial

I while ago I was thinking about what project I wanted the kiddos to do for our Harvestfest and I remembered coming across a picture of someone using an apple as a stamp and decided that's what they would do. I recently looked up apple stamping figuring that you can find anything online and came across another picture of an apple tree on Family Fun online (I love their magazine for ideas too!)

Start by pre-washing all items that you want to stamp (do not use fabric softener.) Next, cut a piece of cardboard to put inside the garments so the paint won't bleed through the other side. Try to make the cardboard large enough to fill most of the shirt so you have plenty of work space, especially if you are doing this project with young children.

You will need to purchase special fabric paint for this. I'm pretty sure they sell it at all craft stores.


I used a small, cheap brush to paint a trunk and some branches on each item. If you have older children, they can do this step themselves but I figured that my 2 & 4 year olds wouldn't do so well with this step. Let the shirt dry either by air if you have time or use a hairdryer.

Cut an apple in half, trying to get a nice apple seed design. I also cut some small wedges out of the back of the apple to give small fingers a place to hold onto (sorry the picture isn't very clear once I cropped it.)Place a good amount of green fabric paint on a paper plate and dip the apple half and simply stamp it on the shirt. It helps to hold it in place and push down for a few seconds to give the fabric paint a chance to soak in.

Remember to have everyone involved wear old clothing and art smocks since you are working with fabric paint!


My daughter's work in progress...
My son's work in progress...
My work in progress... I purposefully left "holes" in the tree to leave spots to stamp the red apples. My kids obviously did not do that and theirs turned out fine.

 I didn't photograph the last step but when the green paint is dry, go back and fill in the tree with the red apples! When stamping the red apples I used the half of the apple which had the stem and tried to get some of it on the shirt when I stamped.

The Finished Projects:


This is just one of those plain canvas shopping bags that I painted.

This is going to be a gift for someone special (no, it's not for me!) I plan to make a pair of matching knit pants to go with it. What is more comfy for a newborn than a onesie and pants? Maybe being naked but this little one will be born when it's still cool so it will have to wear something!

I hope you enjoyed this tutorial and have fun with your own apple stamping!

Amy


Monday, October 31, 2011

I will not be doing a Monday Inspiration today and I am not going to apologize for it!:) I am in beautiful Door County, Wisconsin with my husband! This is our first time getting away from the children! IN. FOUR. YEARS! It is bittersweet, it was hard to leave but it is nice to get a break. Thank you again to my parents for watching our kids so we can enjoy our time!

Have a great week!

Amy

Thursday, October 27, 2011

Acorn Kisses


(At this point I am realizing that maybe I could have put them on something nicer than a paper plate but oh well)

I have seen these babies in a number of places this year. No wonder that they are this fall's hot treat because they are so stinkin' cute! What's even better is that they are easy and don't require a culinary degree to make them! My children enjoyed helping me make these but I warn that this is more like a very messy craft project for them and is not for those who are faint of heart when it comes to doing craft type projects with their children. They looked like Willy Wonka's grandkids when we were finished!
This is everything you need to make the Acorn Kisses- Hershey Kisses, Nutter Butter Bites, thin pretzels and chocolate chips!
First, melt the chocolate in the microwave in 10 second intervals, stirring each time, until chocolate is completely melted.
I found that it works best if you put the melted chocolate on the cookie and then place the Kiss on top. Sometimes I used the entire cookie and other times I twisted the cookie apart. Do whichever you prefer.
Place the Kisses on wax paper to dry.
Once the chocolate is dry, attach the pretzel tops by slightly re-melting the chocolate (do not melt too far or the chocolate will be too soft to stick onto the cookie) and dipping one end. Try to get a small glob on it so there is enough chocolate to "glue" the pretzels. Let dry and you have adorable acorns!
Enjoy!

Tuesday, October 25, 2011

Butternut Squash Soup

Back in my "youth" I worked at a number of phenomenal restaurants and caterers (and occasionally still do!) One of my favorite things that I looked forward to when the weather turned cooler was a wonderful collection of soul-satisfying autumn fare.  My favorite was always squash soup. Since I now am a stay at home mother, I am constantly searching for recipes that replicate food that I regularly enjoyed in my prior life. When I recently found the blog Our Best Bites, I FINALLY found a recipe for Butternut squash soup that satisfies my cravings. It truly feels like velvet on the tongue.  Make it. Try it. You'll love it!


Butternut Squash Soup

1/2 Tablespoon olive oil
1 Tablespoon butter
1/2 Cup sliced carrots (about 1 med carrot)
2 stalks celery, diced
1 Cup diced onion
4 large garlic cloves, minced
1 medium butternut squash, cubed (about 4 cups)
1 medium potato, diced (about 2 Cups)
32 oz chicken broth (that’s one box/carton)
1 Tablespoon brown sugar
1 teaspoon sea salt
3/4 teaspoon dried sage
1 pinch cayenne pepper


In a large stock pot, heat olive oil and butter. When butter is melted add onions, carrots, celery, and garlic.
Saute for 2-3 minutes or until onion is tender. Add the squash, potato, sage, salt, red pepper, and chicken broth. Bring to a boil and then turn down to a simmer. Simmer with the lid on for 30-40 minutes or until everything is tender. Check a piece of squash and also a piece of celery and potato to make sure they area fork tender. Stir in 1 Tablespoon brown sugar.
Use an immersion blender, or transfer soup to a regular blender and puree until smooth.

Sara from Our Best Bites recommends topping with parsley or sour cream.
However, from personal experience and preference, I topped with a drizzle of olive oil and grated Parmesan cheese. Try it this way. The drizzle of olive oil seems unnecessary but it adds an amazing roundness to the soup.

Serves 6-8.

Monday, October 24, 2011

Contentment- It's Your Choice

These days are here, these days are now.
Help us treasure everyday somehow.
Don't look back or up ahead, but
live and love today.
These days are here and then they're gone,
Help us be content; they won't last long,
For we only have these days.

                                    - words by Laurie  Hilliard
                                            -music by Pat and Sharon Autry

   Wow- I was shocked when I came across this. A few weeks ago I started jotting down words very similar to this when I had found a lump on my thyroid which turned out not to be cancer but got me thinking A LOT about my family. Even though the chance was slim that it would be cancer, those days of uncertainty really put many things into perspective and solidified my list of priorities.
    The fact is, I was suddenly looking at my life differently because of a health concern but it could be anything that could put my life or quality of life in jeopardy.  I have said in the past that when I would come across something that I found inspiring, it seamed to fade after time and I would forget about my new found outlook. I didn't want this experience to fade and I realized, truly realized, that tomorrow could be my last day because of a car accident or any other catastrophe. That's when I started writing words that sounded very much like this because I didn't want to forget how I was feeling in that moment. That life is about today. What does that mean for me? That I want to give my best to everything every day. I may have commitments to take my kids to playdates and gymnastics but when I get home, I don't want it to be an excuse for why I didn't read books, do projects or love my children as much as I can. If you have been reading along with my blog, you know that this has also lead to guilt issues that I didn't accomplish everything everyday but I'm working on that!
   Then, not only with my children but also my husband, friends and family I have a different outlook. I let stuff go a lot more now and try to concentrate on the positive. My husband may not be perfect (who is?!) but in the end of the day, I know that he truly loves me (and shows it in his ways) and I find THAT to be much more important than if he helped put the dishes back correctly. I am not perfect myself but I also feel a lot less accepting of negative thinking, my own outlook now is that life is too short!
   In the end, yesterday already happened and all we can do with that is learn from it. Tomorrow hasn't happened yet so why spend precious time today worrying about it when tomorrow can worry about itself!
Have a great week and be content because it is what you have now!
Amy

Friday, October 21, 2011

Christmas Card Holder from A Diamond in the Stuff

This is the cutest idea for storing Christmas cards! OK, so I'm not actually going to make this for myself this year but I will put a shutter on my "keep an eye out at garage sales" list to make for next year. In the meantime, I have to share this tutorial with you from A Diamond in the Stuff that was posted last December. If anyone has an extra shutter laying around, it would save me searching for one so please let me know!


And this was the top half of the shutter:


Isn't this awesome?!
 Once again, the link for this project is at:

Monday, October 17, 2011

Thoughts from Stick a Geranium in Your Hat and Be Happy!

Today I thought I would share just a few simple thoughts I've found in "Stick a Geranium in Your Hat and Be Happy" by Barbera Johnson. I haven't read the entire book yet but some of these extra thoughts at the end of her chapters really stick with me!

__________________________________________________

 
RESOLUTIONS  FOR AVOIDING MISERY

Choose to love- rather than hate.
Choose to smile- rather than frown.
Choose to build- rather than destroy.
Choose to persevere- rather than quit.
Choose to praise- rather than gossip.
Choose to heal- rather than wound.
Choose to give- rather than grasp.
Choose to act- rather than delay.
Choose to forgive- rather than curse.
Choose to pray- rather than despair.

                                          -Source Unknown


_______________________________________________


Life is easier than you think-
All you have to do is:
Accept the impossible,
Do without the indispensable,
Bear the intolerable
and
Be able to smile at anything.

                                          -Source Unknown


_________________________________________________


TRUE UNDERSTANDING

We do not understand:
Joy... until we face sorrow,
Faith... until it is tested,
Peace... until faced with conflict,
Trust... until we are betrayed,
Love... until it is lost,
Hope... until confronted with doubts.

                                         -Source Unknown

____________________________________________________

Have a great week!

Amy

Thursday, October 13, 2011

Fire Starters Tutorial


A number of years ago one of our friend's mother told me how to make homemade fire starters. We enjoy spending many summer weekends around the campfire at the cottage and at my parents' who live up north in Wisconsin. My husband prides himself on being an awesome fire builder and when we made these he was pleasantly surprised how much easier they made starting the fire. I know this comes at the end of summer but it could also be used in fireplaces or make great homemade Christmas gifts for the children to give!
Start with egg cartons and remove the two flaps
 You will need to save dryer lint for a few weeks until you have enough to stuff the egg cartons. It actually takes more than you would think once you really pack it in there. At this point you can tell we have a dog by all the hair in the lint!
 Just take the lint and pack it in the egg spots. If giving as gifts, it would be neat to save fun colors, maybe from the first time you wash new towel, etc.
 Next you will need paraffin wax. A few years ago these paraffin " melting pots" were really popular so if you have one, pull it out. Otherwise, just warm it in a bag in some hot water. It really is ideal to use the paraffin because it is the lowest temperature melting wax. When you use this to start a fire you don't want a wax that needs to get very hot before it melts. Also, if you have young helpers, this means that if by accident the wax would spill or drip on their hand it will just feel hot but not burn them (we use this wax on clients' hands during facials.)
 With a disposable cup, pour just enough paraffin over the lint to cover and seal it. You want to try to use as little as possible to do this and not soak the egg carton.
 The fire starters always turn out better if you have an adorable helper!

When you're ready to use them, just place the fire starters on top of the kindling and under the wood tepee.
Light the fire starter....
Sit back...
And wait for it to slowly turn into a beautiful fire!
Be sure to finish the evening enjoying your fire with...
A gorgeous sunset...
And hotdogs and marshmallows!