Thursday, March 22, 2012

Flower Applique Shirt Tutorial


This whole thing started off with these adorable jeans from Gap. I own two pairs for my daughter and needed something cute to go with them. My inspiration for the large applique was from mini Boden- I love their style- simple & cute. They regularly put a large applique off to the side of a shirt or dress like THIS and it so nicely adds to the garment without it becoming the center of attention. I added more stitching than they do but that was only in attempt to have the shirt more closely match that on the jeans.

Before I show you how to applique, let me show off a few pics of my daughter in the shirt:

          
She's been watching me work on this for a bit and was super excited when I told her that she could finally wear it! And if you're wondering about the last picture- yes, she is part monkey!

OK- so appliqueing can be super easy! Let me show you how:

Start by creating the design. I am not an artist so I try to find something the right size to help me. In this case it was a hamburger piece from a Melissa & Doug build-a-sandwich set. It took me moving the circles a few times and erasing the old before I got it how I wanted it but this was
the final shape. It's not perfectly in shape but that's OK-  it gives it a little character!

Next, place your pattern on the smooth, paper side of the wonder under. Then cut the shape out of the wonder under paper.

**If you are doing a doing a design that needs to be a certain direction, make sure that it is backwards when you trace it on the wonder under!

Place the rough side of the wonder under down on your applique fabric and iron, following the instructions on the wonder under which says to iron each section for 10 seconds. If you do not use the applique right away, I find that the paper peels off easier if you run the iron over it again just to warm it up.

This is the backside of the appliques. You can see here that I left a small margin of fabric around the wonder under- since this is knit and it won't fray, I wanted to have a tiny loose edge to give it more dimension.

Simply peel off the paper from the wonder under, place fabric side up on your project (so wonder under side down) and iron in place. Just to point out the obvious- in this case, iron down the white flower first and then the pink circle.

 This is a good place to mention that this is NOT the steps that you would take if using cotton to applique- you would trace the shape onto the wonder under, cut a larger square with the shape in the middle, iron it onto your fabric and THEN cut out the shape and proceed to iron it onto your project.

So here's the shirt with the flower ironed on. Honestly, if you wanted to stop here you could- it's stuck down for good!

I decided to go on and embellish some though:

This is what you use to do the embroidery. It is a special "thread" called floss. The most commonly found at craft stores is a brand called DMC. It is the same "thread" that is used for cross stitch (which I used to LOVE doing- still do actually but now I don't have that much time.) You can pull the strand apart into six pieces- for this project I used three at a time- so three "threads" in one needle.

From here on out it is just your own create expression on what you want to sew for decoration. It can be a super simple project if you just do the running stitch around the outside of each shape. Actually, I almost stopped there but again, I wanted to make the shirt match the jeans a little more so I did more in the middle.

That's it! Pretty simple, huh? Just think- you don't even have to know how to sew to be able to applique on clothing! You can use this same technique spice up canvas shopping bags, baby onsies, decorative pillows and on and on. From here on out, the sky's the limit!

Happy Appliqueing!

Tuesday, March 20, 2012

Chicken Curry Pasta Salad


One day shortly after we moved here, I found a curry chicken salad at one of the high end grocery stores in our town and I just had to have some! It was amazing! Too bad the price wasn't- I don't remember the exact price but I know that it was high enough that I wasn't going to buy it again. I also wasn't going to live without having this pasta salad either so I created a close replica of the original so that I can indulge (financially) guilt free whenever I want!
I can even usually get my kids to eat this- if your kids don't like any spiciness in foods then try to find a mild curry and you're set!

Oh, and by the way, this is makes an awesome picnic item. I like to make this often in the summer- just pack individual portions in containers and you have a ready to go meal for anywhere- I even take it to the pool!
Chicken Curry Pasta Salad

2 large chicken breasts
½ cup yogurt
2 tsp. curry

 10-12 oz. pasta- I use Campanelle by Barilla
2 Tbsp. olive oil
2 Tbsp. curry
½ cup yogurt
½ cup mayonnaise
1 medium red pepper
5 oz. can sliced  water chestnuts
½ cup golden raisins
salt & pepper

In a medium container, put 1/4 cup yogurt in the bottom, top with 1 tsp. curry, lay the chicken breasts on the mixture, lightly salt & pepper, top with another tsp. curry and 1/4 cup yogurt. Marinade in fridge for at least 2 hours or overnight.
Sear chicken in a medium pan drizzled with olive oil until cooked through. Place on a board to cool, cut and place in a large bowl.
Place 2 Tablespoons olive oil in a small pan, add 2 Tablespoons curry, warm on low-med for 2 minutes to release flavor & aroma.
Cook pasta al dente, drain, LIGHTLY rinse but do not cool it too much & place in bowl with chicken. Add curry from pan, 1/2 cup yogurt and 1/2 cup mayonnaise, stir well. Add red pepper, raisins & water chestnuts. Salt & pepper to taste. Stir well.
Place in fridge overnight.
 In the morning, take out pasta, stir, taste & add more yogurt if necessary to re-moisten.
Happy Cooking!

Monday, March 19, 2012

Carrot Cake Pancakes

I originally posted this a little less than a year ago but just finally got around to adding a picture which always helps- I rarely make a recipe without seeing a picture. Not to sound like a bully but TRY IT! You will NOT be disappointed! (If you're wondering where I got the carrot from, it's part of the Thanksgiving Stuffing set!)

I LOVE this recipe because I can not only get my kids to eat it but they scarf it down! It has a whole pound of carrots to only a little over a cup of flour! In my opinion, it's a mother's dream come true- where else can you get your kids to eat so many vegetables in one sitting?! If you are still sceptical, just try it- it really tastes like carrot cake!

Carrot Cake Pancakes

5.6 ounces all-purpose flour (about 1-1/4 cups) I use a white whole wheat flour
1/4 cup chopped walnuts, toasted- I sometimes leave this out if I'm being lazy and it still turns out great
2 teaspoons baking powder
1 teaspoon ground cinnamon
1/4 teaspoon salt
1/8 teaspoon freshly ground nutmeg- really? I don't know anyone who does this- nutmeg from the jar is fine
dash of ground cloves
dash of ground ginger
1/4 cup brown sugar
3/4 cup low-fat buttermilk
1 tablespoon canola oil
1-1/2 teaspoons vanilla extract- I've said this before- PLEASE don't use imitation
2 large eggs, lightly beaten
2 cups finely grated carrot (about 1 pound) If this step makes you not want to make this because of the time, just use a food processor- the carrots will be shredded and not ground but it still works
cooking spray
3 tablespoons butter, softened
2 tablespoons honey

Combine flour and next 7 ingredients (through ginger) in a large bowl, stirring with a whisk. Combine 1/4 cup brown sugar and next 4 ingredients (through eggs); add sugar mixture to flour mixture, stirring just until moist. Fold in 2 cups carrots.

Heat a large nonstick skillet over medium heat. Coat pan with cooking spray. Spoon 4 (1/4 cup) batter mounds onto pan, spreading with a spatula. Personally, I use a large electric skillet to get more pancakes on at once and use a 1/4 cup measuring cup to scoop the mixture and then flatten in a bit.
Cook for 2 minutes or until tops are covered with bubbles and edges look cooked. Carefully turn pancakes over; cook 1 minute or until bottoms are lightly browned. Repeat with remaining batter. Combine butter and honey in a small bowl; serve with pancakes. When feeding the kids, I usually just serve it with syrup.
Yields: 12 pancakes


Recipe comes from Cooking Light Magazine (January/February 2010.) Originally from  Snooze Restaurant in Denver (303-297-0700, snoozeeatery.com)

Happy Cooking!

Sunday, March 11, 2012

Golden Book Baby Shower Copycat

After all the talk lately of the baby shower (which some of you may be getting sick of hearing about), here is the final Golden Book Baby Shower! I was so happy with how it all came together. It simple and small- which for me is the perfect shower!

My sister-in-law is a teacher so I was thinking that it would be fun to have a shower where everyone brought a copy of their favorite book to include with the gift so she can have a great start to her own collection. After looking around for some ideas I came across this blog which I now love- Aesthetic Nest! She had done an entire shower with a Golden Book theme. It was perfect and I just LOVED the classicness of those books that many of us grew up on!

If you haven't seen it yet, you can take a look at the invitation HERE.
I have my mother to thank for at least half of the decorations on the mantle. She kept all of these vintage Fisher Price toys from when my brothers and I were little. Let's just say that I had quite the selection to choose from. She even has the original record player- remember those? For those of you who are wondering, yes, the clown head on the color stacker is original (it was the most commented on at the shower so I asked my mom.)
The final look of the mantle included a pennant banner, original Fisher Price toys, paper flowers, Little Golden Books and fabric bookends!
These book ends were another "saw it on Pinterest" item. I needed some sort of bookends and couldn't find anything remotely as cute as the ones that Anneliese found for her shower so I made these quick and stole some rice from my kids' rice bin for filling.

The center of the table was set very simple just to connect it in with the shower. I made this simple quilted yellow centerpiece and set it with a few blue paper flowers (original idea also taken from Aesthetic Nest)! I wish I had gotten a nice picture without the harsh sunlight coming in but I guess when you're setting up for a shower, there isn't time for a long photo shoot.

This was my favorite Golden Book from when I was little (and this IS my book.) "Where Did the Baby Go?" is about a little girl who finds a picture of a baby and asks her mother who it is. Her mother keeps giving her clues to help her find the baby and you guessed it- she figures out in the end that SHE is the baby in the picture! After we already decided to do a game where guests had to guess baby pictures, I remembered this book and thought it would be a perfect name for the game!
This is where I used the ribbon board. I forgot to take a picture of it during the shower with all the pictures on it but we asked every guest to bring a baby picture of themselves and I arranged all the pictures on this board and attached a number next to each one.
I know that you have the picture by now but everyone then filled out this card with their guesses. I was surprised that my husband's aunt actually got every single name right!
So, if you have looked at Aesthetic Nest where I found all the printables and are wondering how I made this card from her pages, I'll tell you (I did ask her permission first.) I copy and pasted her page with the book labels (with four on a page) onto a Word document and used a text box to cover her words with the body of this card. I know this is common sense but if you do this, PLEASE give Anneliese credit for all her hard work creating these printables in the first place!
The other game we played was super simple- Guess how many Jelly Bellys are in the jar! I have never been one to enjoy lengthy, mind challenging shower games. I believe showers should be a fun time to get together to "shower" the recipient with love, support and gifts to help them start their new life, either as a wife or mother!

So, take a guess, how many Jelly Bellys in this jar? The answer- 1617! I was asked many times and you are probably thinking this yourself- yes, I counted all of them!


Here is the gift set that I created for my sister-in-law!
These cupcakes are a 100% copycat item- they are so cute AND Anneliese basically hands them to you on a platter with THESE printouts so one would be silly to not just copy hers! She adds some really adorable paper cupcake holders to hers but after cutting out about three of them I decided that the yellow with polka dots were just fine for me!
In addition to the cupcakes, I saw these Cheesecakes in a Jar on Pinterest (originally from The Italian Dish) and just HAD to make these! I mean, come on, have you ever seen anything so cute (and delicious)?! They were a hit too! Only one left at the end (oh, and there were 12 cheesecakes and 10 people- you do the math.)

My Mother-in-law made the food-doesn't it look great?! Mini chicken salad croissants, fruit tray, pasta salad, cucumber sandwiches. It was simple and perfect (and delicious!)
One final last touch as the guests left was to hand out small "Thank You's" filled with Jelly Bellys. I thought who on earth needs four pounds of Jelly Bellys at their house? That is a sure way to end up WITH a jelly belly!

I would just like to thank Anneliese at Aesthetic Nest one more time for all the time she put into all the printouts that she provides AND for being so generous as to share them! She has a number of cute printouts for all sorts of parties at her etsy site too!

Thursday, March 8, 2012

Baby Shower Gift Set

So- for those of you who may have been watching my obsessive baby gift sewing recently, here it is!

 I don't know if I'm the only one who does this but with larger projects on a deadline I keep going back and forth between "I'm right on schedule" and "I'm never going to get this finished in time!" My fear of the second becoming reality gave me the incentive to keep diligently working on these gifts! I do have to admit, however, that I didn't get two receiving blankets done before the shower but she'll get them before the baby's born (which actually reminds me that I should do those today!)

Here's a final look at the collection I created:
A stack of adorable burp cloths is an essential for any baby! The phrase "you can lay the baby in the dresser drawer if you need to" may possibly be true (and maybe disturbing) if you don't yet have a crib but you NEED  burp clothes if you don't want your shirt to become one! OK- a little bit of exaggeration but who would WANT to have a baby without these?

Next on the list is the gift that I'm the most thrilled with the outcome- the stroller bag! Man, do I wish I had one of these when my kids were still in a stroller instead of have to dig for five minutes any time I wanted anything from the bag shoved underneath!

Here are the pacifier clips and the tag blankie! Hopefully both with help to keep my new niece happy as a lark! No fallen or lost pacifiers and a super cuddle blankie with tons of ribbons to keep her busy!

And last but not least the quilted changing pad and nursing cover! I saw a mom at the zoo yesterday nursing her baby with a mildly nervous look on her face. I felt bad for her and wished I could just pull a cover out of my bag and give it to her.  For those of us women who aren't comfortable with the thought of flashing the crowd, the nursing cover is probably the best non-essential gift ever! Actually, after having two kids, I WOULD put it in the essential category.

On to finish posting the rest of the shower!

Quilted Centerpiece

Since I just shared with you the paper flowers, I thought it was a good time to show how to make the quilted centerpiece that they are sitting on in this picture. When I was planning the decorations for the Golden Book Shower (I'll show you the finished shower soon), I wanted to have a simple but cute centerpiece that really felt like it belonged with the shower. Since the invitations were blue and yellow (thank you Anneliese from Aesthetic Nest) and more of the shower was yellow than anything else, it seemed only logical to make the centerpiece yellow based.  

I was seriously surprised when I ended up whipping this out in about a half an hour! It was definitely easy enough that I would make more in the future if I ever just need a little something extra in my house or a party for decoration.
First off, I have to tell you that when I decided to whip this up, I didn't have super high expectations because although it seemed easy in theory, I hadn't done anything quilted before (I know that the fabric is not quilted together but the top stitching is quilted.)

 I started by deciding on the size of the centerpiece and then cutting two pieces of fabric and one piece of Warm & Natural batting. Then layer the pieces with the batting down first and then laying the two pieces of fabric (right sides facing each other) on top of it.
I found a large bowl that would serve as a tracing tool for the ends and traced a curve on with a fadeout marker. Pin the fabrics together and sew around the edge with a 1/4 inch seam, leaving 3 inches open on one of the flat sides for turning.
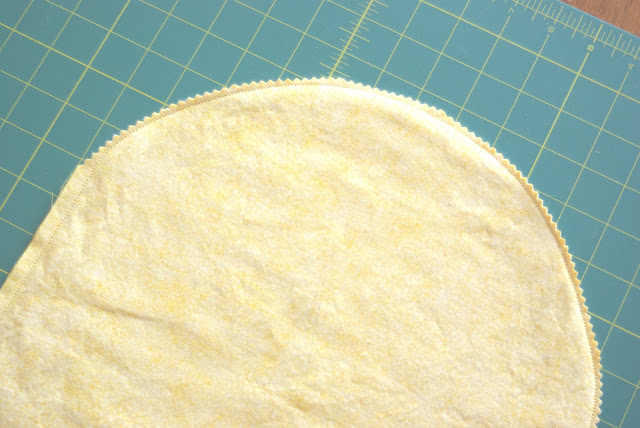
Next, I trimmed the two edges with pinking shears (or you can just clip around the curve but I find the pinking shears a lot faster.) Turn right side out, iron flat and sew around the entire edge of the centerpiece making sure to sew the opening closed.

 Personally, I have fallen IN LOVE with my walking foot and use it with anything that has ANY bulk to it to keep the fabrics from shifting. My sister-in-law would just tell me to pin it more but I have already confessed before that I can be a lazy sewer and find this much faster!
This next part was really fun! With my walking foot still on, I started against the side and just started sewing in a crazy pattern. I thought that I would end up trapping myself somewhere in the pattern but it was easier than I thought to keep going and covering the entire piece in one long crazy line.
To finish, just wash and dry the centerpiece and it comes out with that really neat quilted look!

Happy Sewing!